While a take break from the VC build...
I just got a hold of a Traynor Yba-1. When I got it last week it crackled really loud so I didn't really play it much.
Today I replaced:
Two can caps rated 40 uF @ 450 V for two JJ can caps rated 50 @ 500V
One 8 uF rated @ 250 V for a Sprague 8 uF @ 450 v
A 68 uF rated @ 63 V for a 100 uF @ 100 V.
The amp now is blowing the internal breaker. It plays for a few minutes then it breaks it. If I reset it (There's a reset switch at the back) then it goes for a bit again.
Two things I need to mention tho' (Don't know if they could also have to do with the issue)
The cab I use is rated for 4 ohms and the OT on the amp is 8 ohms. When I got it last week the cab was wired for 16 ohms.
I believe the power tubes are almost done.
Could the last two things I mentioned have anything to do with it?
PS:
I will move the can caps to where the old ones were I just don't have a high power iron yet. I got a 150 V soldering iron today from a buddy but it wasn't enough to melt the solder on the tabs on the old cap cans. (All 4 tabs are soldered per can cap AND with lots of solder on top)
Thanks.
[IMG:800:600]http://i114.photobucket.com/albums/n271 ... c02009.jpg[/img]
Recapping an old Traynor
Moderators: pompeiisneaks, Colossal

Re: Recapping an old Traynor
Bad power tubes could certainly cause the fuse to blow (circuit breaker to trip) in an amp. And since they are easily replaced, that would be a great first step in determining your problems.
I doubt that the impedence mismatch would cause this.
I doubt that the impedence mismatch would cause this.
Re: Recapping an old Traynor
Thx for the quick reply . I will try some new tubes tomorrow. So the 100 uF cap for the 68 uF should be fine then?
-
Nigel Tufnel
- Posts: 57
- Joined: Mon May 29, 2006 11:38 pm
- Location: NC
Re: Recapping an old Traynor
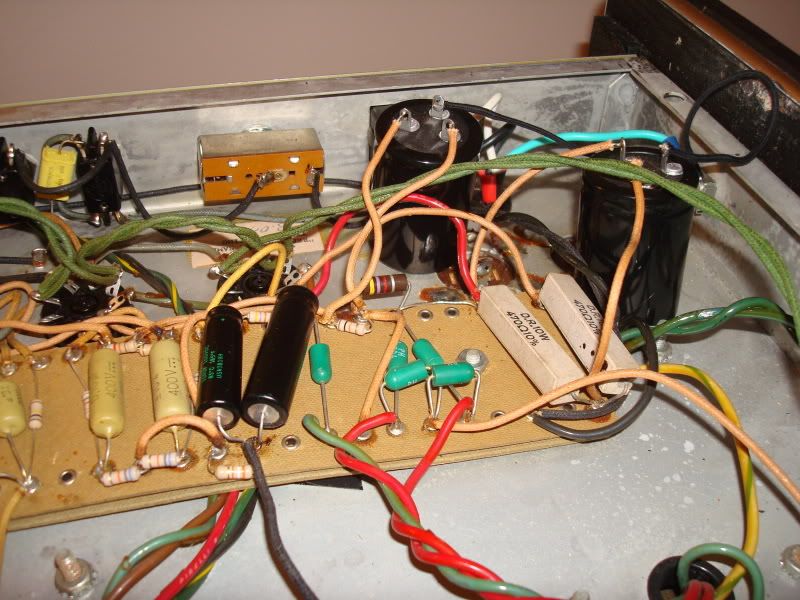
Swap the tubes for sure. As far as melting that solder holding the can caps in.........good luck. They must have used blow torches at the Traynor factory back in the day.  I ended up taking a dremel tool to the ones in mine. I mounted some clamps and stuck f&t's in it. Those are some excellent amps if you massage the circuit a bit. I tweaked one for a guy last week that turned out killer, he's liking it more than his vintage Marshall and Hiwatt. Altering the B+ rail to make it more guitar friendly will make a world of difference for the better. Whoa!!! I just looked at your pic again and it looks like your bias supply caps (the sprague atoms) are backwards. You need to flip the polarity on those, connect the positive end to ground in the bias supply.
Re: Recapping an old Traynor
The caps are backwards?? No wonder the fuse is resetting itself. I would have thought they would've blown up when I turned it on.Nigel Tufnel wrote:Swap the tubes for sure. As far as melting that solder holding the can caps in.........good luck. They must have used blow torches at the Traynor factory back in the day.
The old caps had the plus printed over on that end but I guess they both have a circle thingy to indicate polarity. That could have been bad.
I try to be really careful about polarity but I guess I wasn't careful enough today. I hope the bias supply caps are alright. hopefully the breaker saved them.
I think I might have to go with a dremmel to remove the old caps as well. Somebody is selling a 240 weller soldering gun, but I don't know if that might be enough to melt the solder on top of the tabs on the old cap cans.
Re: Recapping an old Traynor
Heheheh, when I was a kid, me and my buddy used to hook up old electrolytics to a power cord and knife switch.
When you hit the switch and sent 120vac to the caps they exploded like firecrackers.
Yes, you are lucky they didn't blow up.
Hopefully they aren't damaged.
The easiest way to know which end is which, is the negative end will always be the can of the cap. The lead is welded right to the can so you see a shiny metal end there.
The other end, the positive end always has a rubber type, usually black plug that the lead passes through.
No offense but you really need to bone up on electronics, component familiarization and schematic reading.
This stuff can bite you badly if you don't fully understand what you are doing inside the amp.
Tom
Don't let that smoke out!
Don't let that smoke out!
Re: Recapping an old Traynor
Let me get this straight - are you saying that you replaced caps with voltage ratings LOWER than spec'd?tribi9 wrote:While a take break from the VC build...
I just got a hold of a Traynor Yba-1. When I got it last week it crackled really loud so I didn't really play it much.
Today I replaced:
Two can caps rated 40 uF @ 450 V for two JJ can caps rated 50 @ 500V
One 8 uF rated @ 250 V for a Sprague 8 uF @ 450 v
A 68 uF rated @ 63 V for a 100 uF @ 100 V.
The amp now is blowing the internal breaker.
Re: Recapping an old Traynor
No offence taken, I should have known that. In fact I knew about them exploding if installed backwards but on the schematic reading I definitely could use some more familiarizingStructo wrote:
No offence but you really need to bone up on electronics, component familiarization and schematic reading.
.
Is there anyway to test them before I fire up the amp?
Re: Recapping an old Traynor
No he replaced with the same or higher voltage ratings.
Plug the amp into a 50 ft extension cord, go to the other end of the house and plug it in!
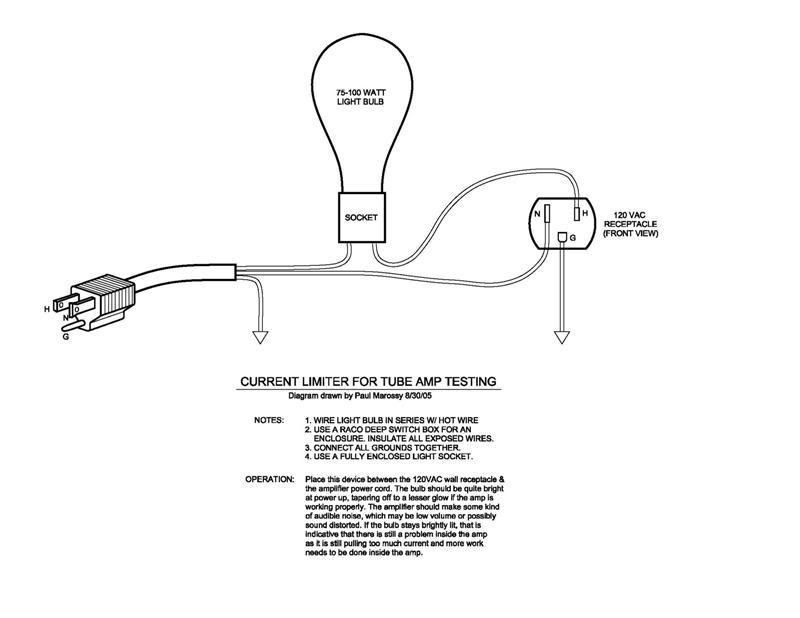
Seriously, do you know what a light bulb current limiter is?
It is a good way to power up an amp for the first time or after a repair.
This is a handy device to have around and also is a good way to charge up new filter caps with less current.
[IMG:800:618]http://i23.photobucket.com/albums/b392/ ... iter-1.jpg[/img]
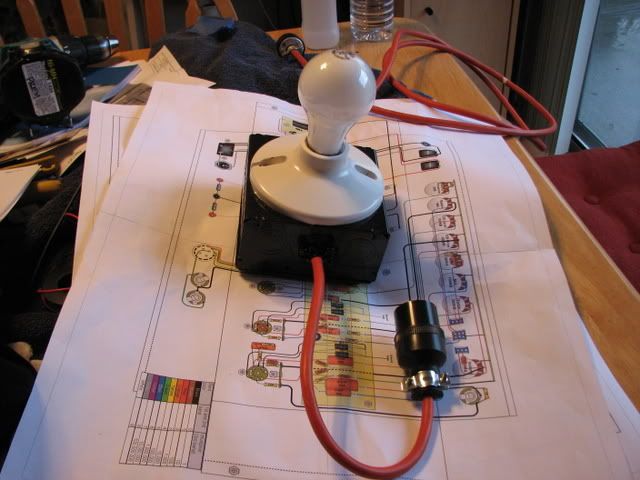
I built mine into a square metal junction box. Used an old extension cord for the plug and socket. I painted the box black.
[IMG:640:480]http://i23.photobucket.com/albums/b392/ ... G_0114.jpg[/img]
When you first switch the standby to play, the light bulb will flash because the filter caps act sort of like a short circuit right at first, but then as they charge the bulb grows dim.
Depending on what wattage the light bulb is, determines how much current the amp draws.
If it stays bright, you have a short somewhere that is drawing excessive current.
Turn the amp to standby while watching the lamp. The lamp should flash and then glow an amount that reflects the "idling" drain of the amplifier. For the 25W lamp, this may be fairly fully on. For higher wattage bulbs, this will be dimmer.
To use the tester, plug the amp under test into the outlet, and choose a bulb. If you've had shorted-AC or fuse-blowing problems, you may want to use a 25W lamp, as this will limit the AC current to a bit under 1/4 ampere. This should allow you to verify that you've fixed the problem without losing any more fuses! If you're debugging a runaway problem where normal operation starts OK but then things get hot, you can use a larger wattage bulb to allow semi-normal operation of the amp but to choke off the AC as the runaway starts. The lamp will glow more brightly as the amp tries to draw more current.
Plug the amp into a 50 ft extension cord, go to the other end of the house and plug it in!
Seriously, do you know what a light bulb current limiter is?
It is a good way to power up an amp for the first time or after a repair.
This is a handy device to have around and also is a good way to charge up new filter caps with less current.
[IMG:800:618]http://i23.photobucket.com/albums/b392/ ... iter-1.jpg[/img]
I built mine into a square metal junction box. Used an old extension cord for the plug and socket. I painted the box black.
[IMG:640:480]http://i23.photobucket.com/albums/b392/ ... G_0114.jpg[/img]
When you first switch the standby to play, the light bulb will flash because the filter caps act sort of like a short circuit right at first, but then as they charge the bulb grows dim.
Depending on what wattage the light bulb is, determines how much current the amp draws.
If it stays bright, you have a short somewhere that is drawing excessive current.
Turn the amp to standby while watching the lamp. The lamp should flash and then glow an amount that reflects the "idling" drain of the amplifier. For the 25W lamp, this may be fairly fully on. For higher wattage bulbs, this will be dimmer.
To use the tester, plug the amp under test into the outlet, and choose a bulb. If you've had shorted-AC or fuse-blowing problems, you may want to use a 25W lamp, as this will limit the AC current to a bit under 1/4 ampere. This should allow you to verify that you've fixed the problem without losing any more fuses! If you're debugging a runaway problem where normal operation starts OK but then things get hot, you can use a larger wattage bulb to allow semi-normal operation of the amp but to choke off the AC as the runaway starts. The lamp will glow more brightly as the amp tries to draw more current.
Tom
Don't let that smoke out!
Don't let that smoke out!
Re: Recapping an old Traynor
Some of those older breakers drift their setpoints. If this amp is new to you but tripping when everything seems correct, try substituting a slow blow fuse for the breaker.

Re: Recapping an old Traynor
Get yourself a 100 Watt iron with a big old wedge tip.(I got mine at a Hobby Lobby) Get it hot and use the tip to pry up on the tabs. It worked great on my '68 YBA-1 recap. I used the same JJ cap cans. These amps sound killer stock, but as others have said, a few tweaks can get them into Plexi or Tweed Bassman territory. I went Plexi direction on mine, and I love it.!tribi9 wrote: I think I might have to go with a dremmel to remove the old caps as well. Somebody is selling a 240 weller soldering gun, but I don't know if that might be enough to melt the solder on top of the tabs on the old cap cans.
Mark
"- Yeah, can we have everything louder than everything else? Right!"- Ian Gillan
Re: Recapping an old Traynor
I inverted the bias caps to where they should have been and wired the cap cans again to test it.
When I turned it on the second time tho' the breaker blew right away and the cap cans bubbled up. (They each got a bubble on top)
Could this be caused by the fact that I might have messed the bias caps yesterday?
I think I defintily need to build a current limiter.
When I turned it on the second time tho' the breaker blew right away and the cap cans bubbled up. (They each got a bubble on top)
Could this be caused by the fact that I might have messed the bias caps yesterday?
I think I defintily need to build a current limiter.
Re: Recapping an old Traynor
I think I did mess up all the caps. Expensive, but a lesson I'll never forget. From now on I will double, triple check polarity every time against the schematic.
I'm going to wait til next week to replace the parts. (We have a holiday on Monday) and I don't have an amp as of now.
It sucks cuz i spent $40 CND in caps.
I'm going to wait til next week to replace the parts. (We have a holiday on Monday) and I don't have an amp as of now.
It sucks cuz i spent $40 CND in caps.
-
Nigel Tufnel
- Posts: 57
- Joined: Mon May 29, 2006 11:38 pm
- Location: NC
Re: Recapping an old Traynor
You only changed the polarity of the bias supply caps correct? Not the JJ cans, they still need to be wired with the negative to ground. Just wanted to make sure.
Re: Recapping an old Traynor
Yes I only changed the polarity on those but I did turn it on and the breaker tripped after like a minute.Nigel Tufnel wrote:You only changed the polarity of the bias supply caps correct? Not the JJ cans, they still need to be wired with the negative to ground. Just wanted to make sure.
After It was pointed out I put them in the proper polarity but as soon as I turned the amp on the breaker tripped immediately and the can cans bulged up. (Even with the bias supply cap in the proper polarity.)