I tried finding the thread where we discussed having the OD trimmer pot mounted externally for ease of adjustment but I didn't have any luck.
It is really hard to search this forum for topics.
I'm thinking about installing the OD trimmer in the form of a pot and use one of the speaker jack holes on the rear to mount it.
I can't remember the consensus about what size pot to use and or tail resistor.
Say that I like my trimmer set to 35K from wiper to ground, would I still use a 100K pot or is it better to use say a 50K pot and 15K or so resistor?
Seems that a lower value pot is going to have a broader sweep vs a high value like 100K or larger.
Thanks!
External OD Trimmer Pot
Moderators: pompeiisneaks, Colossal
External OD Trimmer Pot
Tom
Don't let that smoke out!
Don't let that smoke out!
-
martin manning

- Posts: 14308
- Joined: Sun Jul 06, 2008 12:43 am
- Location: 39°06' N 84°30' W

Re: External OD Trimmer Pot
When searching use the "search for all terms" feature. If you don't you ll get all kinds of random stuff containing your key words.
Re: External OD Trimmer Pot
Thanks, that is the thread I was looking for.
And thanks Chris for the search info.
And thanks Chris for the search info.
Tom
Don't let that smoke out!
Don't let that smoke out!
Re: External OD Trimmer Pot
Yesterday I ended up using a PEC 50k linear pot and a 15K tail for the back panel OD Trimmer.
That should give me a range of 15K to 65K of OD trimmer adjustment.
I left the 220K in place.
I haven't tried it yet to see how I like it.
But later today I will.
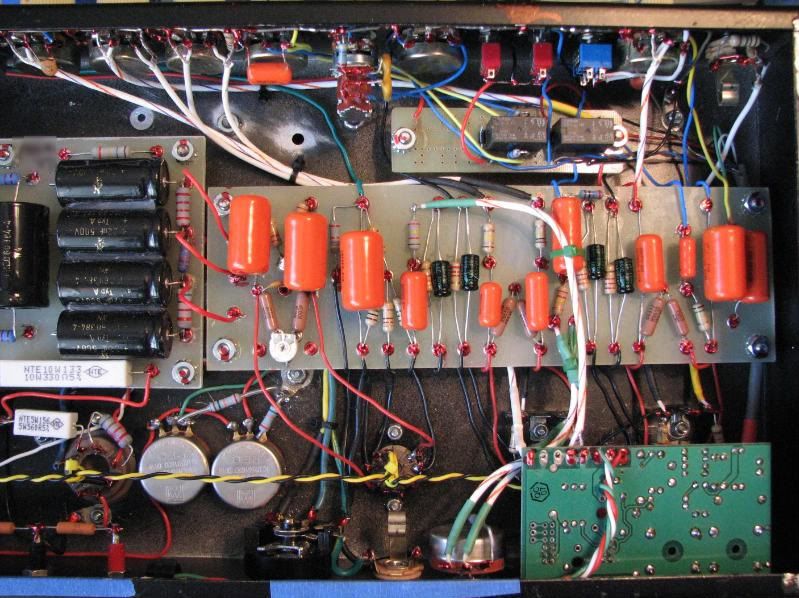
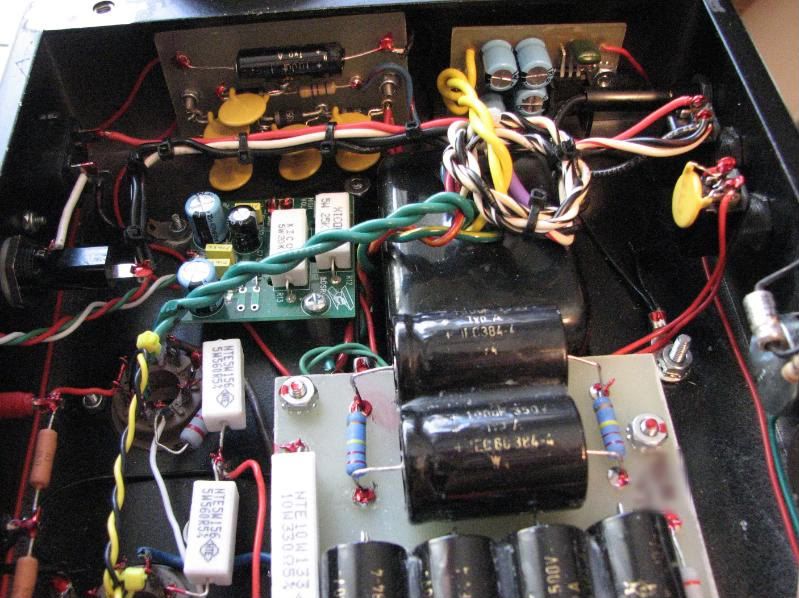
I have pretty much re-wired the entire amp.
Using 20ga solid Teflon for the most part.
The power supply area has 18ga stranded.
Dual bias pots using the PEC locking bushing type.
Updated all the shielded cable to the high quality Teflon stuff from Apex Jr.
I installed UF5408 diodes with .01uf 1kv snubbers.
Heater supply wires ran overhead.
Changed the standby switch to be between the first filter caps and choke resistor.
I put a mid boost on a push/ pull 250K mid pot.
All preamp bypass caps @ 5uf 25v.
I changed the grounding scheme to be more like #124 so we'll see if that is an improvement.
I was getting some hum when both preamp volume and the master were turned way up.
The hiss level was not bad at all.
[IMG:800:600]http://i23.photobucket.com/albums/b392/ ... G_0252.jpg[/img]
[IMG:800:600]http://i23.photobucket.com/albums/b392/ ... G_0254.jpg[/img]
That should give me a range of 15K to 65K of OD trimmer adjustment.
I left the 220K in place.
I haven't tried it yet to see how I like it.
But later today I will.
I have pretty much re-wired the entire amp.
Using 20ga solid Teflon for the most part.
The power supply area has 18ga stranded.
Dual bias pots using the PEC locking bushing type.
Updated all the shielded cable to the high quality Teflon stuff from Apex Jr.
I installed UF5408 diodes with .01uf 1kv snubbers.
Heater supply wires ran overhead.
Changed the standby switch to be between the first filter caps and choke resistor.
I put a mid boost on a push/ pull 250K mid pot.
All preamp bypass caps @ 5uf 25v.
I changed the grounding scheme to be more like #124 so we'll see if that is an improvement.
I was getting some hum when both preamp volume and the master were turned way up.
The hiss level was not bad at all.
[IMG:800:600]http://i23.photobucket.com/albums/b392/ ... G_0252.jpg[/img]
[IMG:800:600]http://i23.photobucket.com/albums/b392/ ... G_0254.jpg[/img]
Tom
Don't let that smoke out!
Don't let that smoke out!
-
Guitarman18
- Posts: 454
- Joined: Tue Sep 04, 2007 9:32 pm
- Location: UK
Re: External OD Trimmer Pot
Tom, that is a tidy looking amp. Nice job!
Sorry to go off topic, but which teflon Coax did you go for at Apex jr? and which brand of 250K (A ?) pot with a pull switch did you use?
Cheers,
Paul.
Sorry to go off topic, but which teflon Coax did you go for at Apex jr? and which brand of 250K (A ?) pot with a pull switch did you use?
Cheers,
Paul.
-
Sonny ReVerb

- Posts: 342
- Joined: Sun Feb 05, 2006 6:54 pm
Re: External OD Trimmer Pot
Tom, nice work. I like the Dr. Z approved solder checks 
"The blues is the roots, the rest is the fruits." - Willie Dixon

Re: External OD Trimmer Pot
Thanks Paul,Guitarman18 wrote:Tom, that is a tidy looking amp. Nice job!
Sorry to go off topic, but which teflon Coax did you go for at Apex jr? and which brand of 250K (A ?) pot with a pull switch did you use?
Cheers,
Paul.
I'm not real sure which coax it is other than Teflon and it appears to be 18ga center. He was out of the 20ga.
The push/pull pot is a Dimarzio. 250KA
It was something I had laying around.
It is a very small import type = cheapo.
I just used it to see if I like the result. If I do then I will buy a better one.
I think Mouser carries an Alpha in push/pull.
Ange,
I installed the dual bias pots quite a while ago.
They are PEC 25KL pots, locking bushings with 15K tail resistors to ground.
They work well for bias because they have a very short slotted shaft and after adjusting you screw the lock nut down so the shaft cannot be turned unless you unscrew the lock nut.
One thing I learned about these, they have the locating tab on the side of the pot.
On the original ones I had snipped those off.
Well the last time I was adjusting the bias, I turned the nut too hard and the pot spun inside the amp, ruining the pot.
So this time I drilled the two locating holes so the tabs fit in, so they cannot spin in place again.
Tom
Don't let that smoke out!
Don't let that smoke out!
red on solder
Tom what are those red dots on the solder points.
a
a
-
David Root

- Posts: 3540
- Joined: Fri Aug 04, 2006 3:00 pm
- Location: Chilliwack BC
Re: External OD Trimmer Pot
So how did it turn out?? I am particularly curious about the grounding arrangement on 124 as I'm used to the galactic star single ground point, but in my Dumbleized 6SL7/2x8417 amp, which is 100W, there is considerable hum at high gain on the OD circuit.Structo wrote:
I haven't tried it yet to see how I like it.
But later today I will.
I have pretty much re-wired the entire amp.
I changed the grounding scheme to be more like #124 so we'll see if that is an improvement.
I was getting some hum when both preamp volume and the master were turned way up.
The hiss level was not bad at all."
I've read the grounding posts that say the single ground point doesn't work in 100W and bigger amps and my (admittedly limited) experience bears that out.
Last edited by David Root on Sun Dec 06, 2009 3:46 pm, edited 1 time in total.

Re: External OD Trimmer Pot
angelodp
Those are marked solder joints ala Dr Z does that in his amps, don't miss any that way.
Mark
Those are marked solder joints ala Dr Z does that in his amps, don't miss any that way.
Mark
-
Sonny ReVerb
- Posts: 342
- Joined: Sun Feb 05, 2006 6:54 pm
Re: External OD Trimmer Pot
You can also tell if the amp has been worked on.
Original Z work:
[img 610]http://img33.imageshack.us/img33/7286/c ... dunten.jpg[/img]
Original Z work:
[img
 610]http://img33.imageshack.us/img33/7286/c ... dunten.jpg[/img]
"The blues is the roots, the rest is the fruits." - Willie Dixon
Re: External OD Trimmer Pot
Yes I mark the solder joints because when I am done soldering I carefully inspect each joint.
As I proceed I mark the joints so I know I have looked at it.
I just used a red sharpie but I believe Marshall, Hiwatt and others used a special type of paint or sealer.
I think it served to protect the solder from oxidizing and also to show if the amp had been tampered with.
I am not totally sure but I think that Harry Joyce of Hiwatt fame started this practice because it was military spec practice to do this.
David,
I haven't had proper time this weekend to thoroughly put the amp through its paces.
I had to do a bunch of stuff around the house (honey do list). I hope to
try it out sometime later today.
I think if you follow the #124 layout for grounding and lead dress that it should turn out fine.
I did power it up and set the bias, at that time I cranked the volume and master.
It has way less hum then it did before.
There is some hiss at full throttle but I believe that is fairly typical of these amps.
Selection of V1 can help that quite a bit if you want to try a bunch of tubes for that spot.
Tom
Don't let that smoke out!
Don't let that smoke out!